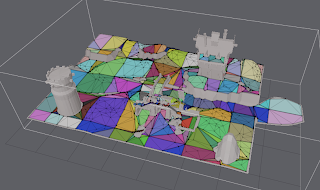
I have been working recently on the area generation improvements. One area I have been researching is how to generate and store the different areas. It looks like there is need for two kinds of areas, the ones that describe the basic structure of the level, such danger spots, and the ones that are modifiers to the previous ones, such as encoding movement type into the mesh.
Additionally some areas may need dilation and others may require erosion. For example the general walkable space needs to be eroded by the agent radius (if desired), while an area marked for crouching should be dilated at least the agent radius, same applies for danger locations too.
The area generation code will most likely get quite a bit more complicated. That is one reason I've been looking into some alternative ways to partition the area into simpler pieces.
I like water shed partitioning because it generates nice regions, but another way faster alternative is monotone partitioning. One thing that is really nasty about monotone regions is that in practice it tends to create a lot of long sliver areas, which is not good for navigation.
The above picture shows a scene partitioned which is processed by partitioning the walkable are into monotone regions. The region buiding process is almost an order of magnitude faster (my favorite performance improvement), the total build time about twice as fast. Normal single pass process suffers a lot from long sliver polygons, but the tiled process is almost unaffected.
It is going to be a challenge to implement the area stuff efficiently. I'm not too worried about actually tagging the areas, but any further process such as dilation or other kinds of filtering can become a bottleneck. Not to mention how setup the API, and how the Detour API is going to cope with that without exploding.
Tags and flags are nice, but sometimes they can end up bloating your compact data.
Sunday, August 30, 2009
Thursday, August 27, 2009
Font Stash
Rendering strings without OS support is always pain in the ass. Add different font faces, font sizes and languages into the mix and it is not funny any more. I like typography and I like having good font rendering in my apps. Sean's awesome stb_truetype was such a relief for me. No more big and ugly Freetype to be included with your project!
Now that actually generating the glyphs was not a problem anymore, I thought I'd try to create a font cache which would allow me to load few fonts faces and render strings as any font size I please. The glyphs are rendered and packed into a texture as they are needed. There are few recent opengl font rendering projects which inspired me on the way (that pango/cairo/clutter opengl thing and one example written in D).
Another thing that was important for me was to be able to render localized strings. I like UTF-8 for its' simplicty, and after googling around for a while I found Bjoern Hoehrmann's Flexible and Economical UTF-8 Decoder.
Putting all the pieces together is Font Stash. It's Xcode only, with simple SDL example. Should compile on VC without much tinkering. Performance should be ok-ish, there are spikes when new glyphs are rasterized and running out of cache behavior is not too nice. This release is not nice and its not clean, but it might evolve into something more usable later on.
Download Font Stash 1.0
Monday, August 24, 2009
Recast and Detour 1.4 Released
The detail height mesh is finally here! I eventually managed to make it work with all the possible combinations of usage cases currently supported by the toolkit. That led me to think if I should drop one of the variations in future releases. If managing all of them gets too complicated, that might happen.
This update added some changes to the build procedure too. Now you need to create a detail mesh even if you do not want to use the subdivision feature. Search for rcBuildPolyMeshDetail in the samples to see how to call it. The function takes poly mesh, compact height field and two parameters as input.
The technique creates a small local triangle mesh for each navmesh polygon. Each polygon is processed in turn. First the outline of the polygon are tesselated at specified sample distances. Then each sample point will receive new height value from the heightfield and finally redundant vertices are removed from the outline. The edges are processed so that matching edges from different polygons will create same curve.
Once the outline has been processed the points will be triangulated. Then, additional sample points will be generated inside the original polygon. If a sample point is too far from the triangulated height surface, it will be added to the triangle mesh. This procedure will be repeated until all sample points have been added or all sample points are within a certain distance from the detail mesh.
The parameter which controls the sample distance is called detailSampleDist and the parameter which described the maximum allowed error when the mesh or poly outline is simplified is called detailSampleMaxError. If you set both parameters to zero, you will get simple compact mesh which will not add any additional points to the surface (that is, the old behavior).
Ideally I would have liked to have just one parameter, the max error. In practice it turned out that sharp features in the heightfield would add excessive amount of extra vertices. The goal was to add little as possible data to get a bit better height representation of the navmesh. The sample distance acts as a low pass filter. In order not to run into similar problems as with the texture approach, the sampling is point sampling. This allows to technique to produce detail meshes which align perfectly at polygon boundaries.
The sample distance also is good trade-off between time and quality. The algorithm is not particularly well optimized, but it does not add more than 10% of generation time when you use large enough (around 4-8 cells) sample distance.
The single pass navmesh generation did not change much, but as I posted earlier, the tiled process was not as easy as I predicted. Initially I had a lot of trouble at finding a way to create seamless detail meshes at the tile boundaries. Finally I decided to remove the extra vertices which are generated by the region partitioning. This turned out to work fine, even if the code which does that is not super clean.
This obviously changed the tiled generation code quite a bit. I think it is much cleaner now. The changes are not that complicated, take a look at the sample for more details.
If you are using the tile navmesh, the change to your pipeline is as simple as with the single pass method. Again, the sample is your friend what it comes to details.
I think the Detour API to use the height values is not as full fledged as it will be. Once I get to implement the path following code I will add more useful features there. If you have certain requests already, let me know.
The new version can be downloaded from the usual address. Here's direct download link for your convenience: http://recastnavigation.googlecode.com/files/Recast-1.4.zip
I think I might tackle the jump links or areas next.
Thursday, August 20, 2009
Navmesh Height Accuracy pt. 5
So fitting the detail mesh into the tiled preprocess was not as painless as I hoped. The problem is that the detail mesh requires the edges of the polygons to align perfectly as well as it requires the heightfield present to pull the date from.
While the tiled process has all kinds of good properties, one thing that was quite complicated to get right was how to handle T-junctions between the tiles. The region partitioning system can create extra vertices along the tile edges. Just imagine open field, with one obstacle. Most of the tiles will be just one region, whilst the tile which has the obstacle will be split into several regions. That extra region would create T-junctions along the tile edges.
The way I handled this earlier was just that first I rasterized all the tiles, one at a time, and stored the region contours, which is just little amount of data per tile. After all tiles had been processed, I would post process all the neighbor contours so that they equal vertices along the tile edges. After that, I would build a the polygon mesh from the contours.
That was all fine back them. But now, the detail mesh generation requires the heightfield and matching contours to be present at the same time. And keeping the heighfield in memory is not an option since there just is not enough of it in some cases.
Well, the past day or two I have been working slightly different approach to the per tile generation. We will see how it will turn out. I have had quite a few dead ends recently, so I'm prepared that it will fail :) The idea is that first I will detect the extra vertices along the tile edges and then I would remove them from the polymesh and then generate the detail mesh. Since there are minimum number of vertices per tile edge, there is no T-junctions. That way I do not need to fix up the contours in second pass and all is good again.
It took me a while to come up with this solution, even if it sounds like the best thing to do. I guess I'm just subconsciously trying to dodge every solution which requires adding or removing a vertex from triangle mesh and keeping the resulting mesh still valid.
I don't want to make a quad-edge mesh thing-a-magic just for few vertices that needs to be removed and the code to handle vertex removing and triangle patching on simple flat mesh structures is just pain it the arse. If someone has good pointers how to remove a vertex from 2D trimesh and keep the remainder of the mesh in good shape (no overlaps, etc), let me know.
Adding the detail mesh has been quite a journey. There has been many more detours on the way than I expected. It's been awesome ride, nonetheless.
Recast Settings Uncovered
Some folks have been wondering what is the meaning behind some of the Recast generation settings. Here's a quick primer how to derive the correct values.
First you should decide the size of your character "capsule". For example if you are using meters as units in your game world, a good size of human sized character might be r=0.4, h=2.0.
Next the voxelization cell size cs will be derived from that. Usually good value for cs is r/2 or r/3. In ourdoor environments, r/2 might be enough, indoors you sometimes what the extra precision and you might choose to use r/3 or smaller.
The voxelization cell height ch is defined separately in order to allow greater precision in height tests. Good starting point for ch is cs/2. If you get small holes where there are discontinuities in the height (steps), you may want to decrease cell height.
Next up is the character definition values. First up is walkableHeight, which defines the height of the agent in voxels, that is ceil(h/ch).
The walkableClimb defines how high steps the character can climb. In most levels I have encountered so far, this means almost weist height! Lazy level designers. If you use down projection+capsule for NPC collision detection you may derive a good value from that representation. Again this value is in voxels, remember to use ch instead of cs, ceil(maxClimb/ch).
The parameter walkableRadius defines the agent radius in voxels, ceil(r/cs). If this value is greater than zero, the navmesh will be shrunken my the agent radius. The shrinking is done in voxel representation, so some precision is lost there. This step allows simpler checks at runtime. If you want to have tight fit navmesh, use zero radius.
The parameter walkableSlopeAngle is used before voxelization to check if the slope of a triangle is too high and those polygons will be given non-walkable flag. You may tweak the triangle flags yourself too, for example if you wish to make certain objects or materials non-walkable. The parameter is in radians.
In certain cases really long outer edges may decrease the triangulation results. Sometimes this can be remedied by just tesselating the long edges. The parameter maxEdgeLen defines the max
edge length in voxel coordinates. A good value for maxEdgeLen is something like walkableRadius*8. A good way to tweak this value is to first set it really high and see if your data creates long edges. If so, then try to find as bif value as possible which happen to create those few extra vertices which makes the tesselation better.
When the rasterized areas are converted back to vectorized representation the maxSimplificationError describes how loosely the simplification is done (the simplification is Douglas-Peucker, so this value describes the max deviation in voxels). Good values are between
1.1-1.5 (1.3 usually yield good results). If the value is less, some strair-casing starts to appear at the edges and if it is more than that, the simplification starts to cut some corners.
Watershed partitioning is really prone to noise in the input distance field. In order to get nicer ares, the ares are merged and small isolated areas are removed after the water shed partitioning. The parameter minRegionSize describes the minimum isolated region size that is still kept. A region is removed if the regionVoxelCount < minRegionSize*minRegionSize.
The triangulation process greatly benefits from small local data. The parameter mergeRegionSize controls how large regions can be still merged. If regionVoxelCount > mergeRegionSize*mergeRegionSize the region is not allowed to be merged with another region anymore.
Yeah, I know these last two values are a bit weirdly defined. If you are using tiled preprocess with relatively small tile size, the merge value can be really high. If you have followed the above steps, then I'd recommend using the demo values for minRegionSize and mergeRegionSize. If you see small patched missing here and there, you could lower the minRegionSize.
I hope this helps a bit adopting Recast and Detour!
Sunday, August 16, 2009
Height Detail Mesh Progress
I made some good progress over the weekend. I rewrote the code a couple of times and now it starts to be acceptable. I changed my crappy vertex insertion code to actual Delaunay triangulation code and the meshes looks far better now, and the speed is about the same.
The height detail mesh is not as accurate as the rest of the Recast functionality. But it gives great height approximation. If you want to make the character to follow terrain accurately, I'd recommend to use the navmesh height as starting point, add some offset and do a ray/sphere cast.
Now I have spent more time integrating the code to rest of the system and doing small rewrites here and there in order to move the data around easier. I'm currently working on the Detour side, making sure all the required functionality is there. Next up is smooth path tessellation so that it conforms the detail mesh and support for tile preprocess as well as tile navmesh. One little feature and a lot of support coding.
I have been recently neglecting to reply to project related emails which require longer replies. I try to arrange some time soon to make it happen. So if you are waiting for a reply, don't panic, I try to answer soon :)
Wednesday, August 12, 2009
Navmesh Height Accuracy pt. 3
Third time the charm, I guess.
Whilst the subdivision based method worked well, I was not too happy about the memory usage and how complicated the data ended up being. So inspired by the blog comments I thought I will give simple detail trimesh a try. The idea is that there is tiny trimesh per polygon which is only used for the height calculations.
The naive proto code to calculate the detail mesh is about 10x slower than just the subdivision. Gladly there are plenty of opportunities to optimize it. The above mesh took about 16ms to calculate. The memory consumption is 26kB for the above scene versus 42kB with the subdivision data. There are some room for optimization there too. Some of the vertex data is not shared for example.
I'm not still 100% happy about the detail mesh generation process. My first approach was to initially create dense trimesh using the subdivision method I presented earlier and then simplify the mesh. Deleting vertices from a trimesh is always painful process, and while I got it working OK, deciding which vertices to remove was not so simple task. I wanted something simple, but the code started to look like full blown mesh decimation library, so I ditched the idea. In addition to the complexity of the implementation, there were seams at the borders of the polygons.
My second approach was to insert vertices instead of removing them. The approach is somewhat similar to Fast Polygonal Approximation of Terrains and Height Fields, just a bit simpler and a hint more brute force. First I tesselate and simplify the edges of the nav polygon to make sure the detail meshes match at the boundaries and then the resulting polygon is triangualted. Then I calculate a set of samples and insert them as vertices into the mesh, starting from the most distant sample, until all the samples are within certain error distance to the mesh.
I hope this solution will be the final one. Need more testing to see if the detail meshes align correctly and work in all cases. And I thought this problem was the easiest one on my todo list.
Tuesday, August 11, 2009
Recast and Detour Discussion
I just added a Google group for Recast and Detour questions, feedback and other discussion. You are of course welcome to comment on the blog topics here too.
http://groups.google.com/group/recastnavigation
Sunday, August 9, 2009
Navmesh Height Accuracy pt. 2
The heightmap texture idea turned out to be a lot more complicated than I expected. It works fine with dense texture data, but totally breaks when you have lower resolution textures. The grand idea was to use bilinear interpolation to find the height at given location inside the polygon.
The silly thing with that kind of interpolation is that it needs samples outside the polygon too, and figuring out those samples becomes more and more complicated the lower the resolution of the texture map. It is very easy to fill in extra samples using dilation, but making sure that the interpolated samples match at the polygon boundaries turned out too difficult a task.
Above is a picture which show a common problem case. On left you can see the original navmesh. On right you can see what happens when the mesh is tesselated and vertex heights are sampled from the height map. A lot of discontinuities there and on certain locations height is just plain wrong. The way the interpolation breaks is a bit different at different resolutions.
No matter what kind of data I tried to put into the texture and how I tried to sample the texture, there always seems to be stupid corner cases where the technique just fails.
The texture idea is definitely tempting, maybe it can be used for something else later on.
After all, the main rule of thumb for this kind of auxiliary data is that every bit of data should give a bit better result, not vice versa.
_
Now that I was not happy with the texture approach, I though I will give another go at the tesselation idea. The problem with that technique initially was that I could not find any tesselation algorithm which would work well with arbitrary convex polygons. Simple edge midpoint and polygon centroid subdivision schemes would be trivial to implement, but they are exceptionally horrible with sliver polygons.
The main properties of the tessellation algorithm I was looking for are as follows:
- It should work with arbitrary convex polygons
- It should create relatively uniform tesselation
- The tesselation at the borders of the polygons should match given same tesselation threshold
- The resulting aux data that will create same tesselation at runtime should be as small as possible
The basic idea behind the subdivision scheme is that you split the polygon from the mid point of the longest edge of the polygon to the opposite side of the polygon. The split point on the opposite side is either the start, midpoint or end of the edge depending which one is closest to point which is boundaryLength/2 away from the split start point along the polygon boundary. Then the process recurses on both sides of the polygons.
Once all the edges of the polygons are less than the tesselation threshold, then the polygon is split along the shortest diagonal until the result is a triangle. Take a look at the code for more details.
This is how it looks when applied to the problem case of the heightfield texture at different resolutions. Now any added data will improve the result!
Here's the example case from previous post with the tesselation technique.
The subdivision method also allows quick point location within the tesselated polygons. Since the polygon is always subdivided using a single plane, it is possible to only tesselate that side on which the sample point lies and as the final result is a triangle it is triavial to find the correct height.
My idea is to precalculate the subdivision "stack" and store the split indices and height offsets per iteration. I'm still playing around how to store this data in a compact way. 32bits per iteration should be enough.
And as an added bonus (I love added bonuses!), it is possible to implement this method as a filter to the poly mesh too before it is passed to the pathfinder, so those who need more finely tesselated navmeshes can benefit from the tesselation technique too.
Subscribe to:
Posts (Atom)