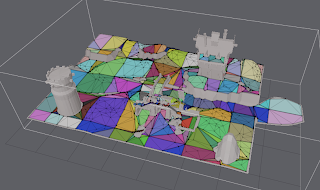
The detail height mesh is finally here! I eventually managed to make it work with all the possible combinations of usage cases currently supported by the toolkit. That led me to think if I should drop one of the variations in future releases. If managing all of them gets too complicated, that might happen.
This update added some changes to the build procedure too. Now you need to create a detail mesh even if you do not want to use the subdivision feature. Search for rcBuildPolyMeshDetail in the samples to see how to call it. The function takes poly mesh, compact height field and two parameters as input.
The technique creates a small local triangle mesh for each navmesh polygon. Each polygon is processed in turn. First the outline of the polygon are tesselated at specified sample distances. Then each sample point will receive new height value from the heightfield and finally redundant vertices are removed from the outline. The edges are processed so that matching edges from different polygons will create same curve.
Once the outline has been processed the points will be triangulated. Then, additional sample points will be generated inside the original polygon. If a sample point is too far from the triangulated height surface, it will be added to the triangle mesh. This procedure will be repeated until all sample points have been added or all sample points are within a certain distance from the detail mesh.
The parameter which controls the sample distance is called detailSampleDist and the parameter which described the maximum allowed error when the mesh or poly outline is simplified is called detailSampleMaxError. If you set both parameters to zero, you will get simple compact mesh which will not add any additional points to the surface (that is, the old behavior).
Ideally I would have liked to have just one parameter, the max error. In practice it turned out that sharp features in the heightfield would add excessive amount of extra vertices. The goal was to add little as possible data to get a bit better height representation of the navmesh. The sample distance acts as a low pass filter. In order not to run into similar problems as with the texture approach, the sampling is point sampling. This allows to technique to produce detail meshes which align perfectly at polygon boundaries.
The sample distance also is good trade-off between time and quality. The algorithm is not particularly well optimized, but it does not add more than 10% of generation time when you use large enough (around 4-8 cells) sample distance.
The single pass navmesh generation did not change much, but as I posted earlier, the tiled process was not as easy as I predicted. Initially I had a lot of trouble at finding a way to create seamless detail meshes at the tile boundaries. Finally I decided to remove the extra vertices which are generated by the region partitioning. This turned out to work fine, even if the code which does that is not super clean.
This obviously changed the tiled generation code quite a bit. I think it is much cleaner now. The changes are not that complicated, take a look at the sample for more details.
If you are using the tile navmesh, the change to your pipeline is as simple as with the single pass method. Again, the sample is your friend what it comes to details.
I think the Detour API to use the height values is not as full fledged as it will be. Once I get to implement the path following code I will add more useful features there. If you have certain requests already, let me know.
The new version can be downloaded from the usual address. Here's direct download link for your convenience: http://recastnavigation.googlecode.com/files/Recast-1.4.zip
I think I might tackle the jump links or areas next.
thanks!
ReplyDeletebtw, i am using ui from recast, very stylish and convinient thing. Is it fully your idea, or you get it from another source?
The way the gui is arranged is called IMGUI. I think I first saw that idea in http://mollyrocket.com/forums/ , thought, I have used same kind of style for years, in less formalized way.
ReplyDeleteMake sure you get the latest GUI code. There was a bug in the button code, which allowed the user to press invisible buttons.
ok, i will..
ReplyDeletealso i added progress and adding edit into mgui.
Previously, I had UI, script based, but it was so hard to edit something.
I am new to navigation mesh and path planning. I have been trying to use recast. I wanted to know if recast can be used for large areas. Is there any limit on how large the grid can be?
ReplyDeleteYes there is a limit. The tile navmesh can have several thousand tiles active at any given time, and you can swap them in and out as you need, this is usually called streaming.
ReplyDeleteFloating point accuracy will become problem at certain point. Usually you start to see precision problems when the coordinates get closer to 4000m.
Thank you for the information.
ReplyDeleteIf I have to go from pt. A to pt. B in a large map, does it not mean that I have to generate navmesh for the entire map at once.